Jun 29 2009

MULLIGAN MACHINE: LOWER YOUR XS650 FORKS; LOW BUCK GARAGE TECH

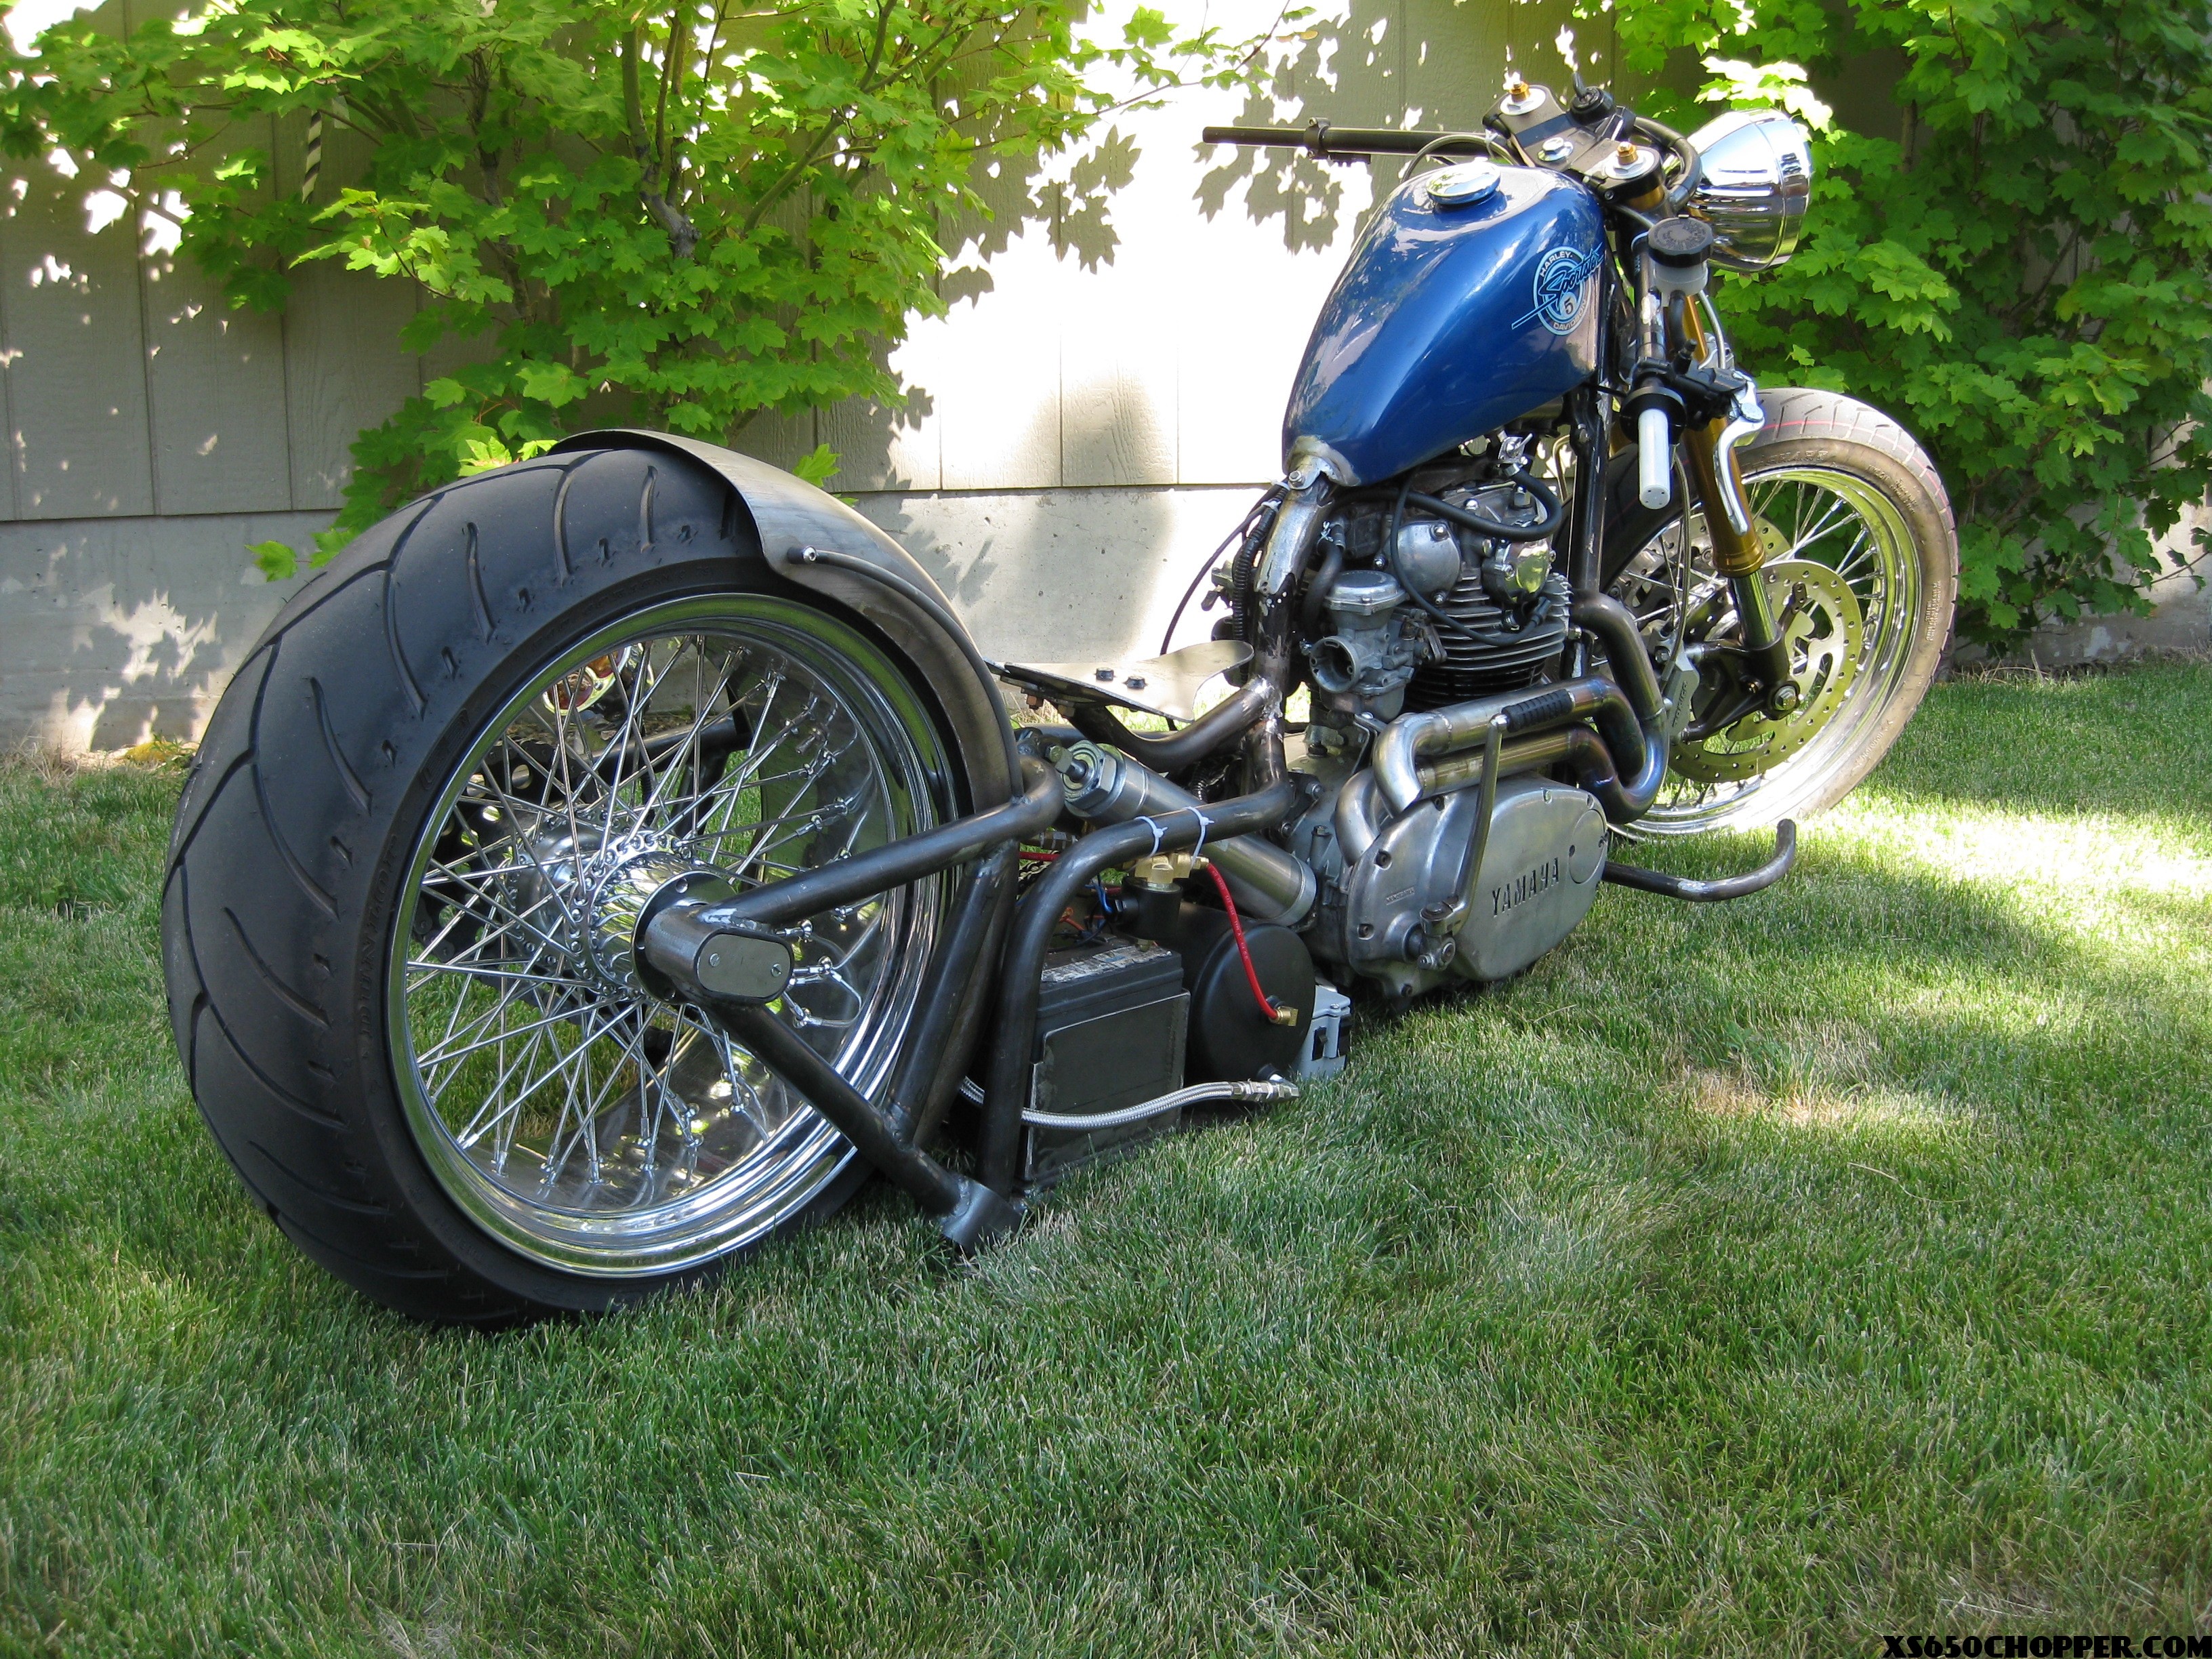
THE PROPER WAY TO LOWER YOUR XS650 FORKS

As of  late, I have been trying to gather pics and information to start some low buck garage tech tips. One of the easiest and cheapest mods to do, would have to be lowering the front forks. When lowering my forks a few months ago, I attempted to take a couple pics of the whole process. As I sat down to write this very article, I realized that I do not have what it takes to make a full article from beginning to end. In usual form, I failed miserably at taking the time to stop and snap pics of each step.  With my camera in hand, I start to step into the garage to snap some photos of the whole process (again). Right before I get past the threshold, I recall a full write-up archived at one of the forums I frequent.The Chopper Underground.

In order to make sure credit is given where it is due, I would like to personally thank Justin for his willingness to put together such a well written/pain free step by step. He was gracious enough to allow it to be placed here at XS650chopper.com for all of you chopperfiends  to see and learn from.

AND SO THE JOURNEY BEGINS…..

To disassemble the tubes from the slider, you will need an 8mm allen wrench for the bottom of the slider and a 17mm allen to hold the damper rod in place. I did not have the 17mm allen, but I did have an extra fender bolt that fit the bill perfectly.
17MM2 MULLIGAN MACHINE: LOWER YOUR XS650 FORKS; LOW BUCK GARAGE TECH
PICTURE 1

I used red lock-tite (permanent) to secure the acorn nut to the bolt, which ensures the two will not separate before the damper rod does. I then used a 17mm socket attached to a series of extensions to place the acorn into the damper rod.

Now that you have fashioned a suitable tool for the damper rod, we proceed to dissasembly. The first step, is to take all the preload out of the fork tube cap. This will lessen the chance of your cap shooting across the room and putting out an eye. This is done with a large regular screwdriver. You will need to push down hard while turning, until it comes to 1/4” below the surface of the cap.

forkparts5 MULLIGAN MACHINE: LOWER YOUR XS650 FORKS; LOW BUCK GARAGE TECH

PICTURE 2
forkparts6 MULLIGAN MACHINE: LOWER YOUR XS650 FORKS; LOW BUCK GARAGE TECH
PICTURE 3

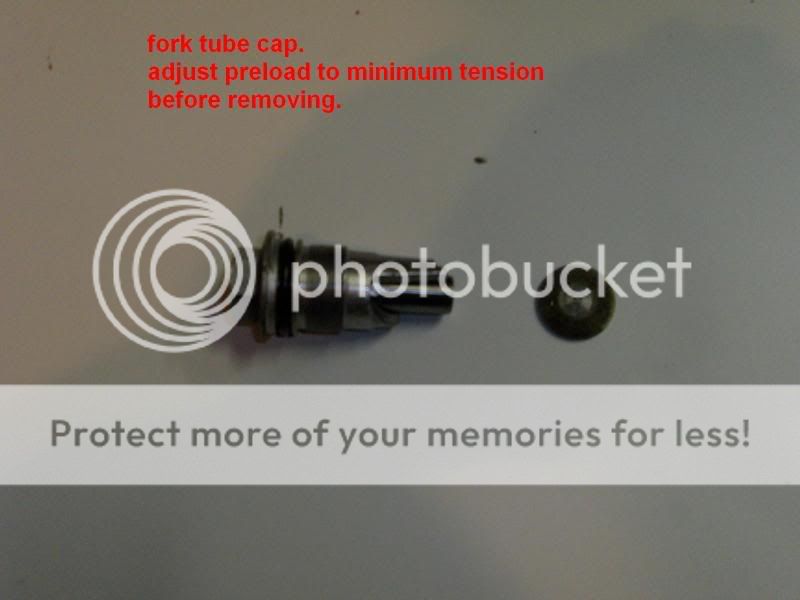
You will now need to lift bike so the front wheel is off the ground. Now you can remove caps. It will pop up a little bit when it unthreads fully. Do not lose the solid washer underneath the cap. Do this with one or both trees still fastened so the tubes do not rotate. Pull out the fork springs and set aside. Loosen the pinch bolts on trees, and remove forks/sliders. Drain oil from tubes. Now place slider in a vice. I used the mounts for the caliper and some blocks of wood as to not scar the aluminium.
forkparts1 MULLIGAN MACHINE: LOWER YOUR XS650 FORKS; LOW BUCK GARAGE TECH
PICTURE 4

Place socket and 17mm allen tool into fork tube and the 8mm allen wrench in bottom of slider. Mine worked out to the socket wrench hit the bench, so I didnt even have to hold it in place. I also used a small cheater bar (3/8” socket extension) on the 8mm allen wrench.
This bolt is locktited from the factory, and will give resistance all the way out. I would advise using blue loctite during reassembly. Once the 8mm bolt is removed, you can slide the fork tube out of slider. The damper will slide out of the top of the tube, and the small damper spacer will come out of the bottom of the tube. Clean all of the internal parts as you disassemble, to rid them of sludge from ancient oil.
forkparts4 MULLIGAN MACHINE: LOWER YOUR XS650 FORKS; LOW BUCK GARAGE TECH
PICTURE 5
forkparts2 MULLIGAN MACHINE: LOWER YOUR XS650 FORKS; LOW BUCK GARAGE TECH
PICTURE 6

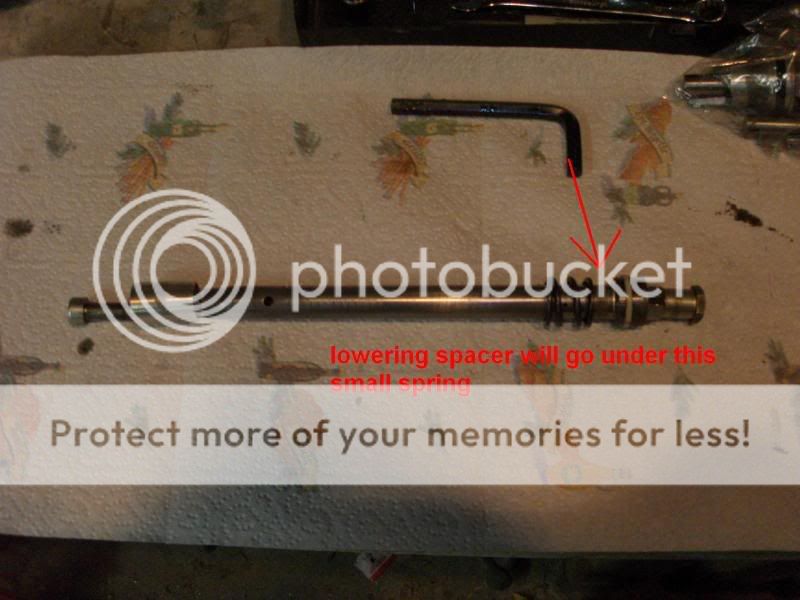
By now you should have your forks dissasembled and ready to make your desired lowering spacer. I used a tube from an old dumb bell, that is 1” o.d. and 20mm i.d. (never throw metal away). Here is lowering spacer installed on damper rod below the small spring.
shockguts MULLIGAN MACHINE: LOWER YOUR XS650 FORKS; LOW BUCK GARAGE TECH
PICTURE 7

A comparison to the stock fork assembly.

shockguts1 MULLIGAN MACHINE: LOWER YOUR XS650 FORKS; LOW BUCK GARAGE TECH
PICTURE 8

Here is what needs to be cut off the large spring. The springs in these are progressive. Which means it has a tighter coil pattern at the top, compared to the bottom. I will be cutting the spring from the botom, so I can keep the progressive action of the spring.
shockguts2 MULLIGAN MACHINE: LOWER YOUR XS650 FORKS; LOW BUCK GARAGE TECH
PICTURE 9

By now, you should have your spacer made to desired length, and be ready to cut your larger spring. I chose 1/4” shorter than than the length of lowering spacer, which equals 2”. Just to clarify my spacer was 2 1/4” making 1/4” of extra preload on the springs. I bought a 10” metal cut off blade for my chopsaw. It was $5 at Lowe’s. A small price to pay for an accurate cut on a spring. I set up a stop block on my saw to 2”, including the width of the blade.
choppingsprings1 MULLIGAN MACHINE: LOWER YOUR XS650 FORKS; LOW BUCK GARAGE TECH
PICTURE 10

now my springs fit 3/4” lower than the tube, which is 1/4” higher than stock.
choppingsprings2 MULLIGAN MACHINE: LOWER YOUR XS650 FORKS; LOW BUCK GARAGE TECH
PICTURE 11

Now is a good time to shave your sliders of any unused tabs before your final reassembly. Do not forget to add blue loc-tite to the 8mm allen bolt during final reassembly. It may seem that the bolt cannot come out due to the axle placement, but the damper rod may unscrew from the inside resulting in a tragic wheelie.

This concludes your XS650 front end lowering class.

Justin

If you have any extra tips or possible slight differences you have seen between different year forks, feel free to comment below and let it be heard. Once again Justin, I appreciate your effort and time as well as many others.

Thanks

CAPTAIN AWESOME

Should we do more of these tech articles?

Are some of you interested in contributing to a new section of this site possibly called the XS650 Chopper TECH Library? Leave a comment below!

7metalwest blacktopBrat-adHugh-PMA-Ad-2

49 Comments on this post

  1. martin madariaga said:

    Tech articles are AWESOME!!!!!! Without these, I would have no Idea on how to do anything to my bike. I definitely support a tech library section. As I build my bike more and more, I turn to places like this for help if I don’t know how to do something. I got an ’83 xs, and will be performing the front fork lowering, and eventually the charging system re-wiring.

    June 30th, 2009 at 12:20 am
  2. Ted said:

    Cool martin.

    I was thinking of doing a whole tech library focused specifically on common things that guys do when Chopping a xs from start to finish however, there is no way in hell I can do it myself. It is awesome to have guys like Justin, CAPTAIN AWESOME, Brian Durk and other guys down to contribute.

    June 30th, 2009 at 12:27 am
  3. Larry said:

    Yes, tech articles are GREAT!

    June 30th, 2009 at 6:07 am
  4. dave said:

    MOAR!!! I live for tech articles

    June 30th, 2009 at 9:06 am
  5. HenkelMike said:

    Definately more tech articles, they are very useful.

    June 30th, 2009 at 11:10 am
  6. dave said:

    Tech articles are gold for motorcycle and mechanic newbs like me!

    June 30th, 2009 at 6:22 pm
  7. andy carter said:

    i would be down to write some if you want. lord knows i have enough pics. let me know ted and i will write some up or you could just direct people to my blog if you wanted? either way works.

    -andy carter

    July 1st, 2009 at 1:57 am
  8. metalho said:

    Cool justin lower case, LOL………….. Glad to see this tech article posted, you did a great job on it. Thanks man! You be bro status. Did you get a pic of your scoot posted, its worth lookin at!

    July 1st, 2009 at 4:53 pm
  9. bob parsley said:

    awesome. more more more…

    July 2nd, 2009 at 1:53 am
  10. CAPTAIN AWESOME said:

    i vote YES for more tech!

    July 2nd, 2009 at 10:14 am
  11. Phrog said:

    I’ve just started my chopper / bobber project and tech articles like this one will be indispensable! More tech articles for us aspiring builders would be more than welcome!

    July 2nd, 2009 at 6:03 pm
  12. justin said:

    wow, im glad you like, ive tried to post a pick but…

    July 2nd, 2009 at 10:35 pm
  13. frank GRC said:

    awesome!!! thanks alot for the time and effort it took to do this, just goes to show how much you love the bikes and the people who ride them. love to see more tech tips

    July 3rd, 2009 at 12:13 am
  14. Blacksmithbilly said:

    good tech articles = less wasted time & money

    July 3rd, 2009 at 6:05 am
  15. Keith Allibone said:

    Listen, I just finished my bike a few weeks ago and I just found this site a few days ago. I’m now on here everyday. I would have killed for a site like this with some decent tech articles. I know there are some good ones out there but I favor this site cause mostly all the bike on here are kick ass and its just set up well. This site has inspired me to do another build and make some changes to my current ride. I’m down for the tech articles, bring em…..

    July 4th, 2009 at 8:58 pm
  16. Ted said:

    @ Keith
    cool man.. Glad that you found the site.

    Looks like we are going to have to start a xs650 chopper tech library.

    July 6th, 2009 at 6:02 pm
  17. Rusty Nutz said:

    Yeah more articles.

    I’d like to see more closeup details like how to mount a rear fender on rubber mounts in excruciating detail. Also how to add a disc brake to a springer. How to mount the rear disc cylinder to a hardtail. How to mount fake oil tank on rubber mounts.

    Good detail on this article btw. thnaks for saying where to get cutoff blade.

    July 8th, 2009 at 12:28 pm
  18. Angry John said:

    More tech!

    August 3rd, 2009 at 1:34 pm
  19. Ted said:

    This post came in very helpful this afternoon. I shaved the tabs off the lower Fork tubes today and installed the lowering spacers..

    @Angry John
    We will have some more tech articles soon man.

    August 6th, 2009 at 2:03 am
  20. J-Bagz said:

    do you know of anyone that offers a service of shaving the lower legs free of the fender tabs/brake tabs

    September 23rd, 2009 at 7:09 am
  21. reynoldburton said:

    Big thanks for sharing “fork lowering knowledge” to us! I did it today, and it looks really great. It´s such a difference for that low (or no) bucks – more tech please!

    October 17th, 2009 at 5:10 pm
  22. locO leoN said:

    hey what a great thread!!..
    I have a gorgeous set of Girder forks that was modified with an XS650 neck for sale if anyone is interested:

    http://dotheton.com/index.php?topic=11459.0

    It would be a straight bolt on to any xs650 frame!!..

    Its located in Toronto Canada…

    October 20th, 2009 at 8:19 pm
  23. bird said:

    awesome. i have a basket case ’74 xs in my basement. the more bikes i see, the more inspired i become. and, consequently, the more bikes i see with custom stuff i want, i don’t know where to begin. this article is fantastic. thanks for posting it. i have been looking for some step x step instructions (with pics no less!) for lowering the forks. keep ‘em coming please!

    October 21st, 2009 at 7:59 am
  24. jimster said:

    great article!
    How low can xs forks be lowered? Is 3 inches too much?

    October 25th, 2009 at 9:12 pm
  25. justin said:

    jimster,
    i lowered mine 2 1/4” and drew a line on the fork tubes with a marker. after going for a ride it was 1” away from bottoming out. so id say that 3” of lowering would leave you with 1/4” of play left. i fill my tubes to 6” from the top,springs out, forks compressed. you could fill it a bit higher or use a different weight of oil to stiffen it up some. i think i used straight 10w..
    justin

    November 3rd, 2009 at 12:03 am
  26. Bow said:

    Love to read all the good tips over the technical stuff,you never to old to learn

    January 21st, 2010 at 5:14 pm
  27. Skylar said:

    So, if my forks are stock- but I want a stiff ride w/a small amount of rebound, I’d go with 10W ATF, in what amount? Can’t seem to get a good answer on this.

    March 10th, 2010 at 5:48 pm
  28. Tomcat said:

    Did this mod today. Nice write up. Thanks. I’ll be using a mid weight motor oil like 20w to fill to stock level.

    March 25th, 2010 at 11:59 pm
  29. Mike Root said:

    I have a question to those who have done this: On the dampner rod there is a hole where the spacer should go that will be covered by the spacer. How will this effect dampening? That hole should be able to have flow should it not?

    Root

    April 28th, 2010 at 2:24 pm
  30. Ted said:

    @ Mike Root- There were multiple holes on the ones I lowered. Also, the spaces I used were not completely tight around the lower connecting rod (oil could still make it to the hole). This mod has been done by hundreds of people. It works.

    April 28th, 2010 at 4:09 pm
  31. Bryan said:

    I’m trying to lower my forks on my 75′ and my inner parts are different. I don’t have that little spring. Instead I have a metal tube spacer that is approx. 3-3.5″ long. I’m assuming after I cut my springs 2″ shorter, I make a new tube spacer that is 2″ longer than the stock one? Does that sound right? I’m really trying to get my forks back on soon. Thanks

    April 28th, 2010 at 8:48 pm
  32. chris said:

    is there a place where i can purchase these spacers? pls email me at socerlife3@aol.com if you know… thanks!!!

    May 4th, 2010 at 10:16 am
  33. Ted said:

    You could probably find some spacers at a hardware store. However, if you have a old set of handlebars lay around you could just cut the end off and use that as a spacer.

    May 4th, 2010 at 3:19 pm
  34. Mister said:

    I just completed this project, used old handlebars for the spacers. I just need to stiffen up the suspension a little bit. And don’t try this without a vice, I did and was unsuccessful to get to torquing right, so will have to re-do it once I get a vice, looks good lowered! Don’t worry I wont be riding it anytime soon.

    May 10th, 2010 at 10:38 pm
  35. Joey said:

    I’d like a littel more detail about taking the preload out of the cap. All it says is “take all the preload out of the fork tube cap…This is done with a large regular screwdriver. You will need to push down hard while turning, until it comes to 1/4” below the surface of the cap.”

    Push down on what?
    Until WHAT comes to 1/4″ below the surface of the cap?

    June 10th, 2010 at 8:19 am
  36. REEB! said:

    So if I need to take 2 7/8 out to level out my frame do I cut 2 7/8 out minus a 1/4? And what determines the length of the spacer?

    June 28th, 2010 at 10:21 am
  37. REEB! said:

    Joey….push down hard on the screwdriver to back out the bolt That is at the top of you forks. This takes the tension off. And it would be the sane bolt that cones to a 1/4 below the cap

    June 28th, 2010 at 11:03 am
  38. Harry Carmony said:

    This is REALLY GREAT…- An invaluable Resource…- Really Appreciate the guys who dont mind sharing what they know….

    June 28th, 2010 at 11:25 pm
  39. REEB! said:

    To correct my last comment you push down on the preload adjuster to take the tension off the spring. Inside the tube is a three step pattern pushing down and turning to the right is more tension on the spring. You will be pushing the screw down just over an inch. But to remove the caps u need to push down and to the left. The screw will not come out. It stays in the top cap. Put a 22 socket on the top and spin it off. Then spring will be exposed.

    June 29th, 2010 at 10:48 am
  40. Eric Plough said:

    Tech is always good, MORE, MORE, MORE…………..

    October 4th, 2010 at 8:59 am
  41. pastorchris said:

    I have a 1974 650, my downtubes have an air valve at the top of each tube? Is the preload below this? This may be dumb but i am new at this. Thanks

    October 20th, 2010 at 3:40 pm
  42. pastorchris said:

    My tubes have air valves at the top. I got the tubes out of the sliders but how do I get the springs out? Their is a sanp ring at the end that went in the slider. Why are my tubes so different? My bike is a 1974 650.

    October 21st, 2010 at 6:33 pm
  43. Steven said:

    YES YES YES

    April 27th, 2011 at 8:48 pm
  44. ray brown said:

    I’m curious as to wheather or not this process will work on a set of yamaha dirt bike forks. If so,how could I download and or print this info and pix. I’m not doing an XS,unfortunatly, but it is gonna be yammie based if I can make it run. Any info would be a big help. Keep choppin an makin sparks,ya’ll!!!

    May 24th, 2011 at 11:52 pm
  45. Matt said:

    Tech write ups are the shit. I feel very strongly about that and could talk about it for a long time. I’ll keep it short. Keep writing tech articals and write as many as you can. The type of people that you are aplealing to are thristing for more knowledge. The action taking to do this will only have positive results. The knowledge shared could have been lost and forgotten. How much of our wisdom on building choppers, the way they used to do is already becoming a lost art. That kind of knowledge deserves to live forever, for all that have the calling to build a freedom machine with there own two hands.

    July 6th, 2011 at 12:17 am
  46. Piute said:

    Amen ,Matt.I come back to this sight and others just for tech , and see what has risen from the dead

    August 4th, 2011 at 11:42 am
  47. Strafemall said:

    Tech tips are awesome ! Thanks ! :)

    October 13th, 2011 at 4:27 pm

Leave a comment below: